Appraisal template Tab configuration (HAP_TAB_CONF)

In order to configure the appraisal template layout, go to

Customizing (transaction SPRO) -> Personnel Management -> Personnel Development -> Objective Setting and Appraisals -> Define Tabs and Process Configuration for Template.

You can use also transaction HAP_TAB_CONF.
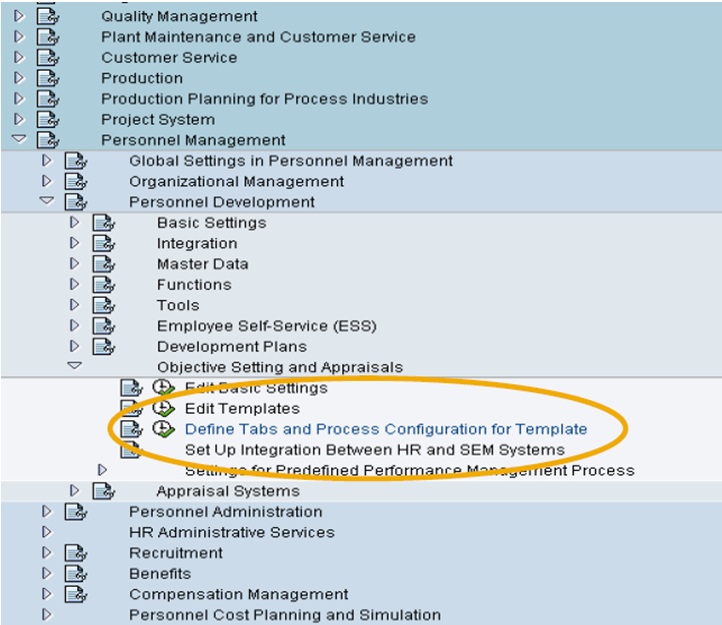
If tabs are not needed, then you do not need to use the Customizing activity Define Tab and Process Configuration for Template.

Configure Employment Status In PA40 and PA30 Screen

For a specific action type, I only want one employment status 2 show, i.e. inactive. rest employment status i.e. active, withdrawn etc should not been displayed while using that particular action type. 

SPRO –> Personnel Management –> Personnel Administration –> Customizing Procedures –> Actions

Step I: Define the info group
a. Define the info group
Eg: Y1: Special Action for Inactive emp
b. Assign info types to that particular info group

Step II: Set up Personnel Actions
a. Under personnel action type, give the action type and expansion eg: Z1 Special Action
b. FC(Function character) give 0
c. Customer Specific status: Leave Blank
d. Employment Status: Give 1
e. Special Payment: Give 1
f. Select PA, PSA, EG, ESG
g. Insert the info group number which you have created which you have defined under Step 1. and save

Step III: Create reasons for personnel actions

Step IV: Change action menu
Assign the action type to the action menu with the necessary user group
Execute the action using PA40 and you can see the changes made.
Employment Status in PA30 Main Screen   
 
How to add the employment status to the main screen of PA30 ?

First get the screen header from view V_582A_B (t.code ->sm30), by default 00 for initial screen, 10 for Action Info type, 03 for Org Assignment Info type, 02 for all the other info type.
Then get the header modifier from view V_T588I (TClass -> A for Employee , B for Applicant).
Once you get the header modifier, you can add (or replace with other field) employee group (IT0001- PERSG) field in header structure through the table T588J (sm30 -> maintain). You need to give the row/column no, to where it should appear.

Dynamic Action Configuration T588Z

Dynamic Actions are performed automatically by the system, depending on certain conditions. If maintaining one infotype has an effect on another infotype, the system automatically displays the second infotype for processing. Dynamic actions can run in the background i.e. the user does not see the run on the screen. A change in one field of an infotype might require, that certain other infotype be updated at the same time. The details can be specified as a dynamic event. It is automatically triggered by the system.

Example 1 – The Personal Data(0002) infotype is newly created, and the Number of children field is filled. Once the record is saved, the system automatically displays the Family/Related Person (0021) infotype and the Child subtype (2) for processing to enter the details about the spouse and the children.

Example 2 – An employee is hired, and the probationary period is entered in infotype Contract Elements(0016). Once this information is saved, the system automatically displays a record from the Monitoring of Dates (0019) infotype and the subtype Expiry of probation (1) for processing.

IMG Path for configuring the Dynamic Action:
IMG -> Personnel management -> Personnel administration -> Customize procedures -> Dynamic actions.

Table: T588Z.

G/L account Configuration

Find the below path to General Ledger account creation in SAP:

SPRO Path:
Financial Accounting –> General Ledger Accounting–>GL Accounts–>Master Records–>GL Accounts Creation and Processing–> Edit GL Accounts(Individual Processing)–>(Centrally/`/Co Code) (FS00 /FSP0/ FSS0)

The GL accounts can either be created centrally or for a company specific or for a chart of account specific. By creating the GL Account centrally the GL account will get created in the company code as well as in a centralized COA and the GL accounts so crated in the COA can also be extended to other Company Codes. When GL accounts are created under a COA the same has to be extended to a company code for which the GL Account to be used.

Creation of GL account using FS00 (Centrally)
In this activity, you can edit the master record of a G/L account centrally in both the chart of accounts and company code specific areas.
You can process G/L account master records as follows:
• Edit
• Change
• Create
• Create with reference
• Block
• Delete, that is, set the deletion indicator

The account group determines the fields for the entry screens if you create or change a master record in the company code.

Open item management
Determines that open items are managed for this account.
Set up accounts with open item management if offsetting entries are to be assigned to the postings made to these accounts. Postings to these accounts represent incomplete transactions.

Creation of GL account using FSP0

Creation of GL account using FSS0

In case the option of copy Chart of Account is used (OBY7) is used then the GL accounts of source COA will be copied to the target COA.

Wage Type Configuration – OH11

Step1: Create Wage Type using Transaction: OH11

Select Copy and then enter the Country.

Enter the existing Wage Type in the left column and the new WT number. Before this we need to check the last WT number associated to an Infotype.

The following tables are updated when we create the WT.

T511 Wage Type Characteristics
T512T Wage Type Text
T512W Wage Type Valuation
T512Z Wage Type Permissibility
T52DZ Assign Customization Wage type to model wage type
T52EL Wage Type Posting
T52EZ Time Dependency of Wage Type Posting
T591B Wage Type Dependent retroactive accounting trigger.

Step2: Enter the description for the WT using transaction “PDSY”

Step3: Check the WT Characteristics: Go to Transaction code SM30: V_T511

Step 4: Permissibility of Wage Type: V_511_B (T511)

Step 5: PCE V_512W_D (T512T, T512W): Select the Wage Type:

Step6: Wage Type Text – V_512W_T (T512T, T512W)

Step7: Wage Type Permissibility V_T512Z (T512Z, T591B)

That’s it. You are all set

Appraisal Configuration

You can either use the new template or the old template. In this post, I will explain how to configure using the old template. The old template uses infotype 0025.

Integration Settings

In Table T7770S, please check the integration settings.
PLOGI APPRA -> Integration switch for appraisal
PLOGI QUALI -> Integration switch for qualifications (In your test system set this to “1 A032 Q”)
PLOGI PLOGI -> 01 to activate integration between: the Organizational Management, Personnel Development, Personnel Cost Planning, Personnel Shift Planning, and Training and Event Management components.

Configuration Path

IMG > Personnel Management > Personnel Administration > Payroll Data > Appraisals

IMG > Personnel Management > Enterprise Compensation Management > Compensation Administration > Eligibility > Define Appraisal Rules

Define Matrix Dimensions

Using Matrix dimensions segments, the values for that dimension can be defined. For example if the value falls between 2.00 and 2.99 the performance appraisal can be set as “C”

Configure OM Infotypes – add/hide tabs

For Example: Hiding or adding the Address infotype tab which gets displayed at the bottom of the PPOME screen.

                The tabs for infotypes can be configured by using the table T77OMTABUS

Steps to configure:

1.       Select the scenario OME0 (Organization and Staffing) from Scenario Definition (Hierarchy Framework).

2.       With the selected scenario, select Tab Page in Scenario for each Object Type tab on the left side under the tab Scenario Definition (Hierarchy Framework).

3.       Double click on the Tab Page in Scenario for each Object Type with the selected scenario.

4.       It will display columns like scenarios, Object type, tab page, sequence, report name etc. The last column would be Do not Display column. It should be checked if that particular infotype for Object Type needs to be displayed else it should be unchecked. 


Note: The columns are the combinations of Object type, tab page etc. So while performing the Do not Display column activity, these combinations should be checked thoroughly based on the requirement.

LSO CONFIGURATION

First install components: LSOFE (LSO Front End in ECC)
Get LSO Authoring Environment and Offline Player from Service Market place
Then follow the configuration as detailed below.

1 – IMG => Training and Event Management => SAP Learning Solution => Activate/Deactivate SAP Learning Solution

2 – IMG => Training and Event Management => SAP Learning Solution => Execute Booking Relationship Harmonization

3 – IMG => Training and Event Management => SAP Learning Solution => Training Management

4 – IMG => Training and Event Management => SAP Learning Solution => Training Management => Basic Settings

5 – IMG => Training and Event Management => SAP Learning Solution => Training Management => Basic Settings => Plan Version Maintenance

6 – IMG => Training and Event Management => SAP Learning Solution => Training Management => Basic Settings => Plan Version Maintenance => Maintain Plan Versions

7 – IMG => Training and Event Management => SAP Learning Solution => Training Management => Basic Settings => Plan Version Maintenance => Set Active Plan Version

8 – IMG => Training and Event Management => SAP Learning Solution => Training Management => Basic Settings => Number Range Maintenance

9 – IMG => Training and Event Management => SAP Learning Solution => Training Management => Basic Settings => Number Range Maintenance => Set Up Plan Version-Independent Number Assignment

10 – IMG => Training and Event Management => SAP Learning Solution => Training Management => Basic Settings => Number Range Maintenance => Define Number Ranges for Objects

11 – IMG => Training and Event Management => SAP Learning Solution => Training Management => Basic Settings => Number Range Maintenance => Define Number Ranges for Course Participation Document

12 – IMG => Training and Event Management => SAP Learning Solution => Training Management => Basic Settings => Object Type Modeling Enhancement

13 – IMG => Training and Event Management => SAP Learning Solution => Training Management => Basic Settings => Object Type Modeling Enhancement => Object Type

14 – IMG => Training and Event Management => SAP Learning Solution => Training Management => Basic Settings => Object Type Modeling Enhancement => Infotype

15 – IMG => Training and Event Management => SAP Learning Solution => Training Management => Course Preparation

16 – IMG => Training and Event Management => SAP Learning Solution => Training Management => Course Preparation => Define Time Schedule

17 – IMG => Training and Event Management => SAP Learning Solution => Training Management => Course Preparation => Location

18 – IMG => Training and Event Management => SAP Learning Solution => Training Management => Course Preparation => Location => Course Location Switch

19 – IMG => Training and Event Management => SAP Learning Solution => Training Management => Course Preparation => Location => Create Location

20 – IMG => Training and Event Management => SAP Learning Solution => Training Management => Course Preparation => Training Provider

21 – IMG => Training and Event Management => SAP Learning Solution => Training Management => Course Preparation => Training Provider => Specify Training Provider Types

22 – IMG => Training and Event Management => SAP Learning Solution => Training Management => Course Preparation => Delivery Methods

23 – IMG => Training and Event Management => SAP Learning Solution => Training Management => Course Preparation => Delivery Methods => Define Delivery Methods

24 – IMG => Training and Event Management => SAP Learning Solution => Training Management => Course Preparation => Delivery Methods => Define Default Delivery Methods

25 – IMG => Training and Event Management => SAP Learning Solution => Training Management => Course Preparation => Create Course Group

26 – IMG => Training and Event Management => SAP Learning Solution => Training Management => Course Preparation => Create Course Type

27 – IMG => Training and Event Management => SAP Learning Solution => Training Management => Course Preparation => Maintain Master Data via Catalog

28 – IMG => Training and Event Management => SAP Learning Solution => Training Management => Course Preparation => Resource Management

29 – IMG => Training and Event Management => SAP Learning Solution => Training Management => Course Preparation => Resource Management => Control Elements

30 – IMG => Training and Event Management => SAP Learning Solution => Training Management => Course Preparation => Resource Management => Create Resource Type

31 – IMG => Training and Event Management => SAP Learning Solution => Training Management => Course Preparation => Resource Management => Resources => Create Room

32 – IMG => Training and Event Management => SAP Learning Solution => Training Management => Course Preparation => Resource Management => Resources => Create External Instructor

33 – IMG => Training and Event Management => SAP Learning Solution => Training Management => Course Preparation => Resource Management => Resources => Create Other Resource

34 – IMG => Training and Event Management => SAP Learning Solution => Training Management => Course Offering

35 – IMG => Training and Event Management => SAP Learning Solution => Training Management => Course Offering => Control Elements

36 – IMG => Training and Event Management => SAP Learning Solution => Training Management => Day-to-Day Activities

37 – IMG => Training and Event Management => SAP Learning Solution => Training Management => Day-to-Day Activities => Control Elements

38 – IMG => Training and Event Management => SAP Learning Solution => Training Management => Day-to-Day Activities => Prebook

39 – IMG => Training and Event Management => SAP Learning Solution => Training Management => Day-to-Day Activities => Booking

40 – IMG => Training and Event Management => SAP Learning Solution => Training Management => Day-to-Day Activities => Booking => Specify Participant Type Control Options

41 – IMG => Training and Event Management => SAP Learning Solution => Training Management => Day-to-Day Activities => Booking => Participant Checks

42 – IMG => Training and Event Management => SAP Learning Solution => Training Management => Day-to-Day Activities => Booking => Conflict Reaction

43 – IMG => Training and Event Management => SAP Learning Solution => Training Management => Day-to-Day Activities => Booking => Fee Handling

44 – IMG => Training and Event Management => SAP Learning Solution => Training Management => Day-to-Day Activities => Booking => Booking Priorities

45 – IMG => Training and Event Management => SAP Learning Solution => Training Management => Day-to-Day Activities => Participation Cancellation

46 – IMG => Training and Event Management => SAP Learning Solution => Training Management => Day-to-Day Activities => Participation Cancellation => Control Options

47 – IMG => Training and Event Management => SAP Learning Solution => Training Management => Day-to-Day Activities => Participation Cancellation => Reasons for Participant Cancellation

48 – IMG => Training and Event Management => SAP Learning Solution => Training Management => Day-to-Day Activities => Participation Cancellation => Cancellation Reason for Cancellations in Learning Portal

49 – IMG => Training and Event Management => SAP Learning Solution => Training Management => Day-to-Day Activities => Approval Workflow

50 – IMG => Training and Event Management => SAP Learning Solution => Training Management => Day-to-Day Activities => Approval Workflow => Specify Workflow Settings

51 – IMG => Training and Event Management => SAP Learning Solution => Training Management => Recurring Activities
52 – IMG => Training and Event Management => SAP Learning Solution => Training Management => Recurring Activities => Course Cancellation/Firmly Booking

53 – IMG => Training and Event Management => SAP Learning Solution => Training
Management => Recurring Activities => Course Cancellation/Firmly Booking => Control Options

54 – IMG => Training and Event Management => SAP Learning Solution => Training Management => Recurring Activities => Course Cancellation/Firmly Booking => Guidelines

55 – IMG => Training and Event Management => SAP Learning Solution => Training Management => Recurring Activities => Course Cancellation/Firmly Booking => Reasons for Course Cancellation

56 – IMG => Training and Event Management => SAP Learning Solution => Training Management => Recurring Activities => Follow-Up

57 – IMG => Training and Event Management => SAP Learning Solution => Training Management => Recurring Activities => Follow-Up => Control Options per Participant Type

58 – IMG => Training and Event Management => SAP Learning Solution => Training Management => Recurring Activities => Follow-Up => Control of Process Steps

59 – IMG => Training and Event Management => SAP Learning Solution => Training Management => Recurring Activities => Follow-Up => Reasons for Course Failed

60 – IMG => Training and Event Management => SAP Learning Solution => Training Management => Recurring Activities => Appraisals

61 – IMG => Training and Event Management => SAP Learning Solution => Training Management => Recurring Activities => Appraisals => Switch On Performance Management

62 – IMG => Training and Event Management => SAP Learning Solution => Training Management => Recurring Activities => Appraisals => Edit Forms

63 – IMG => Training and Event Management => SAP Learning Solution => Training Management => Recurring Activities => Appraisals => Define Form

64 – IMG => Training and Event Management => SAP Learning Solution => Training Management => Recurring Activities => Appraisals => Form of Appraisal

65 – IMG => Training and Event Management => SAP Learning Solution => Training Management => Recurring Activities => Appraisals => Edit Scales

66 – IMG => Training and Event Management => SAP Learning Solution => Training Management => Recurring Activities => Appraisals => Set Up Control Parameters

67 – IMG => Training and Event Management => SAP Learning Solution => Learning Portal

68 – IMG => Training and Event Management => SAP Learning Solution => Learning Portal => Settings

69 – IMG => Training and Event Management => SAP Learning Solution => Learning Portal => Settings => Display Course Participants in the Learning Portal

70 – IMG => Training and Event Management => SAP Learning Solution => Learning Portal => Settings => Preview/Notification Periods

71 – IMG => Training and Event Management => SAP Learning Solution => Learning Portal => Settings => Preview/Notification Periods => Define Preview Period for Courses in the Learning Portal

72 – IMG => Training and Event Management => SAP Learning Solution => Learning Portal => Settings => Preview/Notification Periods => Define Preview Period for Course Groups – Course Types in Days

73 – IMG => Training and Event Management => SAP Learning Solution => Learning Portal => Settings => Preview/Notification Periods => Define Notification Period for Expiring Qualifications

74 – IMG => Training and Event Management => SAP Learning Solution => Learning Portal => Settings => Preview/Notification Periods => Define Default Period for Prebookings

75 – Setting up of Qualifications for Profile Matchup and Qualifications Overview in LSO Portal

76 – Change Qualifications Catalog (T.Code – OOQA)

77 – Change Profile (T.Code – PPPM)

Click here for the link from the SAP website which details the LSO.

ESS CONFIGURATION STEPS

ESS SCREEN ELEMENTS:

DEFINE HEADERS:

SAP IMG => PERSONNEL MANAGEMENT => EMPLOYEE SELF SERVICE => GENERAL SETTINGS => HOME PAGE FOR SELF-SERVICE => HEADERS AND AREA GROUP PAGES => DEFINE HEADERS

DEFINE AREA GROUP PAGES:

SAP IMG => PERSONNEL MANAGEMENT => EMPLOYEE SELF SERVICE => GENERAL SETTINGS => HOME PAGE FOR SELF-SERVICE => HEADERS AND AREA GROUP PAGES => DEFINE AREA GROUP PAGES

DEFINE AREAS:

SAP IMG => PERSONNEL MANAGEMENT => EMPLOYEE SELF SERVICE => GENERAL SETTINGS => HOME PAGE FOR SELF-SERVICE => AREAS => DEFINE AREAS

DEFINE SERVICES:

SAP IMG => PERSONNEL MANAGEMENT => EMPLOYEE SELF SERVICE => GENERAL SETTINGS => HOME PAGE FOR SELF-SERVICE => SERVICES => DEFINE SERVICES

INFOTYPE VIEW INDICATOR:

Service Specific Settings :Maintain feature

SAP EASY ACCESS => PE03 => IVWID

Define Roles – Subtypes and Application Data are defined here. SAP Customizing Implementation Guide (IMG) -> Personnel Management > Employee Self-Service -> General Settings -> Service- Specific Settings -> Own Data -> Define Active Subtypes and Application case 

DEFINE ACTIVE SUBTYPES AND APPLICATION CASE

SAP IMG => PERSONNEL MANAGEMENT => EMPLOYEE SELF SERVICE => GENERAL SETTINGS => SERVICE SPECIFIC SETTINGS => OWN DATA => DEFINE ACTIVE SUBTYPES AND APPLICATION CASE

CREATE RULE GROUP (Configuration steps for Time Management)

SAP IMG => PERSONNEL MANAGEMENT => EMPLOYEE SELF SERVICE => GENERAL SETTINGS => SERVICE SPECIFIC SETTINGS => WORKING TIME => LEAVE REQUEST => PROCESSING PROCESSES => CREATE RULE GROUPS


In Leave request create Rule group – V_HRWEB_RULE_GRP

ADJUST WEBMO FEATURE

SAP IMG => PERSONNEL MANAGEMENT => EMPLOYEE SELF SERVICE => GENERAL SETTINGS => SERVICE SPECIFIC SETTINGS => WORKING TIME => LEAVE REQUEST => PROCESSING PROCESSES=> CREATE RULE GROUPS

“Feature is used in Customizing for the Web application to store different regulations for employee groups. We can store regulations to display Data”

Assign workflow template to each Leave type – where WF ID for new request WF ID for cancellation request and WF ID for Change request are given here. SAP Customizing Implementation Guide (IMG) -> Personnel ManagementàEmployee Self-Service -> Service- Specific Settings -> Working Time -> Leave Request -> Processing Processes -> Specify Processing Processes for types of Leave -> Define Absences/Processing process

Specify how leave is displayed and default values:SAP Customizing Implementation Guide (IMG) -> Personnel Management -> Employee Self-Service -> Service- Specific Settings -> Working Time -> Leave Request -> Lay out of web application -> Specify how Leave is displayed and default values 

DEFINE PROCESSING TO EACH RULE GROUP

SAP IMG => PERSONNEL MANAGEMENT => EMPLOYEE SELF SERVICE => GENERAL SETTINGS => SERVICE SPECIFIC SETTINGS => WORKING TIME => LEAVE REQUEST=> PROCESSING PROCESSES => DEFINE PROCESSING PROCESS FOR EACH RULE GROUP

PROCESSESS FOR TYPES OF LEAVES

SAP IMG => PERSONNEL MANAGEMENT => EMPLOYEE SELF SERVICE => GENERAL SETTINGS = > SERVICE SPECIFIC SETTINGS => WORKING TIME LEAVE REQUEST => PROCESSING PROCESSES => SPECIFY PROCESSING => PROCESSES FOR TYPES OF LEAVES

QUOTA OVERVIEW / TIME ACCOUNTS

CREATE RULE GROUP

SAP IMG => PERSONNEL MANAGEMENT => EMPLOYEE SELF SERVICE => GENERAL SETTINGS => SERVICE SPECIFIC SETTINGS => WORKING TIME ACCOUNTS => CREATE RULE GROUP

MAINTAIN WEBMO FEATURE

SAP IMG => PERSONNEL MANAGEMENT => EMPLOYEE SELF SERVICE => GENERAL SETTINGS => SERVICE SPECIFIC SETTINGS => WORKING TIME ACCOUNTS => CREATE RULE GROUP

SPECIFY DISPLAY OF ABSENCE QUOTAS

SAP IMG => PERSONNEL MANAGEMENT => EMPLOYEE SELF SERVICE => GENERAL SETTINGS => SERVICE SPECIFIC SETTINGS => WORKING TIME
TIME ACCOUNTS => SPECIFY DISPLAY OF ABSENCE QUOTAS

SPECIFY THE CALCULATION OF REMAINING LEAVES

SAP IMG => PERSONNEL MANAGEMENT => EMPLOYEE SELF SERVICE => GENERAL SETTINGS => SERVICE SPECIFIC SETTINGS => WORKING TIME
TIME ACCOUNTS => SPECIFY CALCULATION OF REMAINING LEAVE

DETERMINE LAST DAY OF THE WEEK
Maintain LDAWY feature (To maintain Last day of the working day)
SAP EASY ACCESS => PE03 => LDAYW

SETUP DATA ENTRY PROFILES

SAP IMG => PERSONNEL MANAGEMENT => EMPLOYEE SELF SERVICE => GENERAL SETTINGS => SERVICE SPECIFIC SETTINGS => WORKING TIME => RECORD WORKING TIME => SETUP DATA ENTRY PROFILES

Display view of CATS entry profile:SAP Customizing Implementation Guide (IMG) -> Personnel Management -> Employee Self-Service -> Service- Specific Settings -> Working Time -> Record Working Time -> Define Field Selection and select Data entry selection

SELECT ALLOWED ABSENCE TYPES
(Here we define the absence types that the employees are allowed to enter in CATS Regular. To do this, deactivate all absence types that are only to be processed by the clerk in the SAP system.)

SAP IMG => PERSONNEL MANAGEMENT => EMPLOYEE SELF SERVICE => GENERAL SETTINGS => SERVICE SPECIFIC SETTINGS => WORKING TIME=>RECORD WORKING TIME => SELECT ALLOWED ABSENCE TYPES

TIME STATEMENT

SAP IMG => PERSONNEL MANAGEMENT => EMPLOYEE SELF SERVICE => GENERAL SETTINGS => SERVICE SPECIFIC SETTINGS => WORKING TIME => TIME STATEMENT => ENTER NAME OF HR FORM FOR THE => TIME STATEMENT

TEAM CALLENDAR

SPECIFY ABSENCES TO BE DISPLAYED

SAP IMG => PERSONNEL MANAGEMENT => EMPLOYEE SELF SERVICE => GENERAL SETTINGS => SERVICE SPECIFIC => SETTINGS => WORKING TIME => TEAM CALENDAR => SPECIFY ABSENCE TO BE DISPLAYED

Assign Processing processes to each leave type:SAP Customizing Implementation Guide (IMG) -> Personnel Management-> Employee Self-Service -> Service- Specific Settings -> Working Time -> Team Calendar -> Specify Absences to be Displayed → Define Absences/Processing Process

SPECIFY COLOUR DISPLAY FOR EACH ABSENCE

SAP IMG => PERSONNEL MANAGEMENT => EMPLOYEE SELF SERVICE => GENERAL SETTINGS => SERVICE SPECIFIC => SETTINGS => WORKING TIME => TEAM CALENDAR => SPECIFY ABSENCE TO BE DISPLAYED

SELECT EMPLOYEES TO THE TEAM CALLENDAR

SAP IMG => PERSONNEL MANAGEMENT => EMPLOYEE SELF SERVICE => GENERAL SETTINGS => SERVICE SPECIFIC => SETTINGS => WORKING TIME => TEAM CALENDAR => SELECT EMPLOYEES

DEFINE LAYOUT OF TEAM CALLENDAR

SAP IMG => PERSONNEL MANAGEMENT => EMPLOYEE SELF SERVICE => GENERAL SETTINGS => SERVICE SPECIFIC => SETTINGS => WORKING TIME => TEAM CALENDAR => DEFINE LAYOUT OF TEAM CALENDAR

Creating User ID’s for ESS: Through TCODE SU01 define the user name.Assign User through Communication Infotype(0105)

Configuring personnel actions

1. Access the activity using one of the following navigation options:

Menu  extended table maintenance  table maintenance  services System T588C

Transaction Code SM30 

2. Make a check on User-dep. 
Menu type Menu Text User-dep.
G Y1 Hiring Service Provider checked

IMG Menu  Customizing Procedures  Personnel Administration Personnel Management Define infogroupsActions 

Transaction Code SPRO

User group dependency on menus and info groups 
Menu Text User-dep. Reaction Ref.
Y1 Checked blank 01

Customizing Personnel Administration IMG Menu Personnel Management Set up personnel actions Actions Procedures 

Transaction Code SPRO

Action type Name of action type FC Employ-ment Spec. pymt Check P PA EG ES IG U0000
Y1 1 3 1 _blank x x x x Y1 x

Creating Reasons for Personnel Actions

 Personnel Administration IMG Menu Personnel Management Create reasons for personnel Actions Customizing Procedures actions

Transaction Code SPRO

Reason for Action:
Action Name of action type Act.reason Name of reason for action
Y1 blank blank

1. Access the activity using one of the following navigation options:
Menu
  extended table maintenance  table maintenance  services System VV_T588C_M_AL0

Transaction Code SM30 

2. Choose menu type M.
3. Entry table VV_T588C_M_ALO and make a check on User-dep. 
Menu type Menu Text User-dep. Reaction Ref.
M 01 Actions checked 01

Action Menu

Procedure 

1. Access the activity using one of the following navigation options:
extended table maintenance  services Menu System V_588B_Mtable maintenance 

Transaction Code SM30 

2. Choose menu type M and menu 01.

3. Make the following entry. 
Usergroup No Action Name of action type
01 20 Y1 Hiring action services