ESS CONFIGURATION STEPS

ESS SCREEN ELEMENTS:

DEFINE HEADERS:

SAP IMG => PERSONNEL MANAGEMENT => EMPLOYEE SELF SERVICE => GENERAL SETTINGS => HOME PAGE FOR SELF-SERVICE => HEADERS AND AREA GROUP PAGES => DEFINE HEADERS

DEFINE AREA GROUP PAGES:

SAP IMG => PERSONNEL MANAGEMENT => EMPLOYEE SELF SERVICE => GENERAL SETTINGS => HOME PAGE FOR SELF-SERVICE => HEADERS AND AREA GROUP PAGES => DEFINE AREA GROUP PAGES

DEFINE AREAS:

SAP IMG => PERSONNEL MANAGEMENT => EMPLOYEE SELF SERVICE => GENERAL SETTINGS => HOME PAGE FOR SELF-SERVICE => AREAS => DEFINE AREAS

DEFINE SERVICES:

SAP IMG => PERSONNEL MANAGEMENT => EMPLOYEE SELF SERVICE => GENERAL SETTINGS => HOME PAGE FOR SELF-SERVICE => SERVICES => DEFINE SERVICES

INFOTYPE VIEW INDICATOR:

Service Specific Settings :Maintain feature

SAP EASY ACCESS => PE03 => IVWID

Define Roles – Subtypes and Application Data are defined here. SAP Customizing Implementation Guide (IMG) -> Personnel Management > Employee Self-Service -> General Settings -> Service- Specific Settings -> Own Data -> Define Active Subtypes and Application case 

DEFINE ACTIVE SUBTYPES AND APPLICATION CASE

SAP IMG => PERSONNEL MANAGEMENT => EMPLOYEE SELF SERVICE => GENERAL SETTINGS => SERVICE SPECIFIC SETTINGS => OWN DATA => DEFINE ACTIVE SUBTYPES AND APPLICATION CASE

CREATE RULE GROUP (Configuration steps for Time Management)

SAP IMG => PERSONNEL MANAGEMENT => EMPLOYEE SELF SERVICE => GENERAL SETTINGS => SERVICE SPECIFIC SETTINGS => WORKING TIME => LEAVE REQUEST => PROCESSING PROCESSES => CREATE RULE GROUPS


In Leave request create Rule group – V_HRWEB_RULE_GRP

ADJUST WEBMO FEATURE

SAP IMG => PERSONNEL MANAGEMENT => EMPLOYEE SELF SERVICE => GENERAL SETTINGS => SERVICE SPECIFIC SETTINGS => WORKING TIME => LEAVE REQUEST => PROCESSING PROCESSES=> CREATE RULE GROUPS

“Feature is used in Customizing for the Web application to store different regulations for employee groups. We can store regulations to display Data”

Assign workflow template to each Leave type – where WF ID for new request WF ID for cancellation request and WF ID for Change request are given here. SAP Customizing Implementation Guide (IMG) -> Personnel ManagementàEmployee Self-Service -> Service- Specific Settings -> Working Time -> Leave Request -> Processing Processes -> Specify Processing Processes for types of Leave -> Define Absences/Processing process

Specify how leave is displayed and default values:SAP Customizing Implementation Guide (IMG) -> Personnel Management -> Employee Self-Service -> Service- Specific Settings -> Working Time -> Leave Request -> Lay out of web application -> Specify how Leave is displayed and default values 

DEFINE PROCESSING TO EACH RULE GROUP

SAP IMG => PERSONNEL MANAGEMENT => EMPLOYEE SELF SERVICE => GENERAL SETTINGS => SERVICE SPECIFIC SETTINGS => WORKING TIME => LEAVE REQUEST=> PROCESSING PROCESSES => DEFINE PROCESSING PROCESS FOR EACH RULE GROUP

PROCESSESS FOR TYPES OF LEAVES

SAP IMG => PERSONNEL MANAGEMENT => EMPLOYEE SELF SERVICE => GENERAL SETTINGS = > SERVICE SPECIFIC SETTINGS => WORKING TIME LEAVE REQUEST => PROCESSING PROCESSES => SPECIFY PROCESSING => PROCESSES FOR TYPES OF LEAVES

QUOTA OVERVIEW / TIME ACCOUNTS

CREATE RULE GROUP

SAP IMG => PERSONNEL MANAGEMENT => EMPLOYEE SELF SERVICE => GENERAL SETTINGS => SERVICE SPECIFIC SETTINGS => WORKING TIME ACCOUNTS => CREATE RULE GROUP

MAINTAIN WEBMO FEATURE

SAP IMG => PERSONNEL MANAGEMENT => EMPLOYEE SELF SERVICE => GENERAL SETTINGS => SERVICE SPECIFIC SETTINGS => WORKING TIME ACCOUNTS => CREATE RULE GROUP

SPECIFY DISPLAY OF ABSENCE QUOTAS

SAP IMG => PERSONNEL MANAGEMENT => EMPLOYEE SELF SERVICE => GENERAL SETTINGS => SERVICE SPECIFIC SETTINGS => WORKING TIME
TIME ACCOUNTS => SPECIFY DISPLAY OF ABSENCE QUOTAS

SPECIFY THE CALCULATION OF REMAINING LEAVES

SAP IMG => PERSONNEL MANAGEMENT => EMPLOYEE SELF SERVICE => GENERAL SETTINGS => SERVICE SPECIFIC SETTINGS => WORKING TIME
TIME ACCOUNTS => SPECIFY CALCULATION OF REMAINING LEAVE

DETERMINE LAST DAY OF THE WEEK
Maintain LDAWY feature (To maintain Last day of the working day)
SAP EASY ACCESS => PE03 => LDAYW

SETUP DATA ENTRY PROFILES

SAP IMG => PERSONNEL MANAGEMENT => EMPLOYEE SELF SERVICE => GENERAL SETTINGS => SERVICE SPECIFIC SETTINGS => WORKING TIME => RECORD WORKING TIME => SETUP DATA ENTRY PROFILES

Display view of CATS entry profile:SAP Customizing Implementation Guide (IMG) -> Personnel Management -> Employee Self-Service -> Service- Specific Settings -> Working Time -> Record Working Time -> Define Field Selection and select Data entry selection

SELECT ALLOWED ABSENCE TYPES
(Here we define the absence types that the employees are allowed to enter in CATS Regular. To do this, deactivate all absence types that are only to be processed by the clerk in the SAP system.)

SAP IMG => PERSONNEL MANAGEMENT => EMPLOYEE SELF SERVICE => GENERAL SETTINGS => SERVICE SPECIFIC SETTINGS => WORKING TIME=>RECORD WORKING TIME => SELECT ALLOWED ABSENCE TYPES

TIME STATEMENT

SAP IMG => PERSONNEL MANAGEMENT => EMPLOYEE SELF SERVICE => GENERAL SETTINGS => SERVICE SPECIFIC SETTINGS => WORKING TIME => TIME STATEMENT => ENTER NAME OF HR FORM FOR THE => TIME STATEMENT

TEAM CALLENDAR

SPECIFY ABSENCES TO BE DISPLAYED

SAP IMG => PERSONNEL MANAGEMENT => EMPLOYEE SELF SERVICE => GENERAL SETTINGS => SERVICE SPECIFIC => SETTINGS => WORKING TIME => TEAM CALENDAR => SPECIFY ABSENCE TO BE DISPLAYED

Assign Processing processes to each leave type:SAP Customizing Implementation Guide (IMG) -> Personnel Management-> Employee Self-Service -> Service- Specific Settings -> Working Time -> Team Calendar -> Specify Absences to be Displayed → Define Absences/Processing Process

SPECIFY COLOUR DISPLAY FOR EACH ABSENCE

SAP IMG => PERSONNEL MANAGEMENT => EMPLOYEE SELF SERVICE => GENERAL SETTINGS => SERVICE SPECIFIC => SETTINGS => WORKING TIME => TEAM CALENDAR => SPECIFY ABSENCE TO BE DISPLAYED

SELECT EMPLOYEES TO THE TEAM CALLENDAR

SAP IMG => PERSONNEL MANAGEMENT => EMPLOYEE SELF SERVICE => GENERAL SETTINGS => SERVICE SPECIFIC => SETTINGS => WORKING TIME => TEAM CALENDAR => SELECT EMPLOYEES

DEFINE LAYOUT OF TEAM CALLENDAR

SAP IMG => PERSONNEL MANAGEMENT => EMPLOYEE SELF SERVICE => GENERAL SETTINGS => SERVICE SPECIFIC => SETTINGS => WORKING TIME => TEAM CALENDAR => DEFINE LAYOUT OF TEAM CALENDAR
Creating User ID’s for ESS: Through TCODE SU01 define the user name.Assign User through Communication Infotype(0105)

Configuring personnel actions

1. Access the activity using one of the following navigation options:

Menu  extended table maintenance  table maintenance  services System T588C

Transaction Code SM30 

2. Make a check on User-dep. 
Menu type Menu Text User-dep.
G Y1 Hiring Service Provider checked

IMG Menu  Customizing Procedures  Personnel Administration Personnel Management Define infogroupsActions 

Transaction Code SPRO

User group dependency on menus and info groups 
Menu Text User-dep. Reaction Ref.
Y1 Checked blank 01

Customizing Personnel Administration IMG Menu Personnel Management Set up personnel actions Actions Procedures 

Transaction Code SPRO

Action type Name of action type FC Employ-ment Spec. pymt Check P PA EG ES IG U0000
Y1 1 3 1 _blank x x x x Y1 x

Creating Reasons for Personnel Actions

 Personnel Administration IMG Menu Personnel Management Create reasons for personnel Actions Customizing Procedures actions

Transaction Code SPRO

Reason for Action:
Action Name of action type Act.reason Name of reason for action
Y1 blank blank

1. Access the activity using one of the following navigation options:
Menu
  extended table maintenance  table maintenance  services System VV_T588C_M_AL0

Transaction Code SM30 

2. Choose menu type M.
3. Entry table VV_T588C_M_ALO and make a check on User-dep. 
Menu type Menu Text User-dep. Reaction Ref.
M 01 Actions checked 01

Action Menu

Procedure 

1. Access the activity using one of the following navigation options:
extended table maintenance  services Menu System V_588B_Mtable maintenance 

Transaction Code SM30 

2. Choose menu type M and menu 01.

3. Make the following entry. 
Usergroup No Action Name of action type
01 20 Y1 Hiring action services

Time-Dependency of the Authorization Check

Use
When an employee undergoes an organizational change, you may want to assign him or her
infotype authorizations based on the duration of the organizational assignment. To do so, you
can run authorization checks based on a data record’s history.
Example: At the start of the year, an employee changes from personnel area 0101 to
personnel area 0102. The administrator responsible for processing the employee’s
personal data in the second personnel area is different from the administrator in the
first personnel area. You might want to prevent the administrator who was
responsible for the employee in the previous year from accessing data that is
entered in certain infotypes in the current year. In this case, you can set up the
access authorization for infotype data so that it is dependent on the history of data
records in the employee’s organizational assignment.

Prerequisites
If you want to carry out a time-dependent authorization check, set the corresponding indicator in the Indicator for access authorization field (T582A-VALDT) in the Infotype: Customer Specific Settings table (T582A).

Features
The procedure is as follows:

There are three possible cases:
a) The administrator’s period of responsibility for the employee starts in the future.
If the administrator has write authorization for the relevant infotype/subtype, it is
extended to all infotype records that are valid within the period of responsibility. Read
authorization exists for infotype records that have the same validity period as the period
of responsibility, or that precede the period of responsibility.
b) The period of responsibility starts before the current date. However, the end of the period
of responsibility does not exceed the maximum specified tolerance before the current
date.
In this case, a write or read authorization is extended over all periods. In other words,
there are no restrictions for this administrator in terms of the validity period of the
relevant infotype records.
The tolerance time concept ensures that an administrator can still access the data of an
employee who is no longer within his/her responsibility, for a limited period of time. This
means that the administrator still has the opportunity to close any open issues once the
person has moved.
c) The period of responsibility ends in the past. Even the end that was adjusted to the
tolerance time is before the current date.
In this case, the administrator has no write authorization. Read authorization exists for
infotype records that have the same validity period as the period of responsibility.

Creating custom fields in CATS

To add a few fields in main CATS data entry screen, add those fields in structure CI_CATSDB (This structure is customer extension of the CATSDB table). Assign these fields to the data entry profile.

1. In the IMG, go to Create Customer Fields, then Make Field Assignment,
which takes you to table TCAFI. Create your custom field there, and SAP
will assign a number. This Step will add the field to
the CATS.

2. In Create Customer Fields, go to Add customer fields to field selection. (These screens are confusing)
In the Data entry section, you need to enable your custom field in both the Influencing and Modifiable sections. “Modifiable” is a
global setting; click the radio button to allow input for “Additional
field 1″. Then go to the influencing screen, enter your CATS profile,
and allow input for “additional field 1”. So I suggest to make sure you
have this field enabled for input in both the influencing and modifiable
screens.

Now you should see the field in the CATS timesheet.

Wage Type Processing Basic Concepts – part 2

Now copy the SAP-standard schema U000 to ZUA1 and comment out the initialization schema UIN0 (Figure 3).


Figure 3 Comment out the initialization schema UIN0


In the schema editor, create the production schema (don’t copy it from anything) in my example ZUA0. Be sure to check the Schema can be executed checkbox. (See Figure 4.) Only executable schemas can be entered into the payroll driver selection screen.


Figure 4 Check the Schema can be executed checkbox


The production schema ZUA0 is a simple one, just two lines. (See Figure 5.) First, you call the initialization schema, and then you call the main calculation schema ZUA1.


Figure 5 Schema ZUAO


Copy schema ZUA0 to your test schema ZUAT. (See Figure 6.) You want ZUAT to ignore the control record, so have it use schema UIN0 for initialization. Remember that CHECK ABR is commented out in UIN0. Therefore, both the production and test schemas now use the same calculation logic in schema ZUA1 – which keeps them in sync.


Figure 6 Copy schema ZUA0 to test schema ZUAT


Your custom rules for these examples will go in a copy of schema UAP0. Copy UAP0 to ZUA3 and add lines for each of the five examples. (See Figure 7.) Edit schema ZUA1 to COPY ZUA3 instead of COPY UAP0 (not shown).


Figure 7 Add lines for each of the five examples

Wage Type Processing Basic Concepts

Table 1 

Wage type 

Number 

Rate 

Amount 

2100 

100.00 

2100 

100.00 

4200 

20.00 

1500 

40 

10.30 

412.00 


Relationship of Payroll Driver, Schema (Functions), Rules (Operations)

Each country payroll version supported by SAP has a program called the “payroll driver” that calculates payrolls. For example, in the U.S., the payroll driver is RPCALCU0, in Mexico it is HMXCALC0, and in Canada RPCALCK0. Each one is different, but they share a common core of functionality. The job of the payroll driver is to process payroll functions as specified in a payroll schema. These payroll functions each perform a specific job, for example – reading data from infotypes, calculating taxes, and processing wage types. Some functions process payroll rules. Rules are a collection of payroll operations. Each operation does a small unit of work, such as multiplying a wage type’s number by a rate to get an amount.

Schemas are edited with transaction PE01, and rules with PE02. Functions and operations are maintained with transaction PE04. To view payroll results,

use transaction pc_payresult (or in earlier R/3 releases go to Tools>Payroll result>Display in the Payroll menu). (See Figure 1.)The standard payroll schema for a country can be derived from table t500l. If the country in table t500l has an X in the Old Naming Conv field, then the schema is HR Country Indicator plus 000. Otherwise, it is the ISO Code plus 00. So the U.S. has schema U000 and for Mexico it is MX00.

Header and Table Wage Type Concept

When calculating payroll, wage types are read from infotypes and the Time Management cluster and stored in an internal table called the Input Table (IT). (See Table 1.) In ABAP terms, this is simply an internal table. Various payroll functions and operations can read and update data in this table. Similar to ABAP internal tables, there is a header row. That header row defines which row of data can be accessed by the payroll operations. After manipulating the data in the header row, you can save the row back to the IT, save it to another payroll table, or ignore it. In Table 1 there are three wage types, and wage type 2100 is currently in the header row. After you are done with wage type 2100, wage type 4200 is moved into the header row.

Creating Custom Schemas and Rules

Schema and Rule Naming Conventions

Customer modified schemas and rules need to begin with Z. Many customers simply replace the first letter of the standard schema with a Z – i.e., their modified copy of UAP0 becomes ZAP0. But there can be problems with that convention. For example, you might later implement Canadian payroll and need a modified version of schema KAP0, but ZAP0 is already used for the U.S. For many years, I’ve used a naming convention of Z plus the country identifier and a sequential number for modified rules and schemas. So a modified UAP0 would become ZU01 and a modified KAP0 becomes ZK01.

Editor Documentation

Documentation for the function, operation, schema, and rule editors is available online at http://help.sap.com. Click on SAP R/3 and R/3 Enterprise and then select your release level and language. Then navigate to the Human Resources>HR Tools section.

F1 Help

In the schema and rule editors, place your cursor on a function or operation and press F1 to get help text. A schema or a rule’s documentation is available in the editor via the Goto>Documentation menu. In the schema editor, the F4 key shows possible values for each of the four parameters for whatever function is entered on that line. The same documentation – and more – is available via transaction PDSY.

Creating a Test Schema

For testing purposes, it is useful to have a version of the payroll schema that does not care about the control record (transaction PA03) settings. Bypassing the control record lets you run and save the results for any pay period needed, without having to update the control record. There’s no problem with having such a schema around, since the payroll driver does not save payroll results from a schema that ignores the control record in a production system. For examples, I will show you how to create two schemas – ZUA0, which will be used in production and will check the control record, and ZUAT, which ignores the control record and is used for testing purposes only.

First, create a copy of SAP’s schema UIN0 and name it ZUA2. In the schema editor (transaction PE02) enter schema UIN0, and click the copy button, or Schema>Copy in the menu. Enter ZUA2 for the To schema. Then edit ZUA2 and make the CHECK ABR line executable by removing the asterisk in the D column. (See Figure 2.) The CHECK function is commented out by SAP in the standard schema, so you uncomment it here for use in the main ZUA0 schema.

AS-IS Phase, AS IS Documents

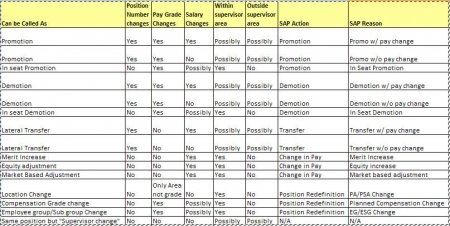
If you are capturing various as-is HR Processes at your client’s company and would like to understand various data changes that happen during each process, then the below grid would be very helpful for you.

If you want to know what is AS-IS documents, process, read below:

What a funcional Consultant does during AS-IS process?

1) Attends a series of meeting with the client – mainly to capture the organizational structure of the company, the different work schedules, leave types, pay scales, etc. The objective of these meetings is to the gather the existing HR processes and structure of the company

2) Depending on what modules of SAP HR are being implemented, different questions need to be put forward to the client. A complete set of Blueprinting questions can be found here.

3) Prepares the business blue printing (BBP) documents describing the complete AS-IS process

4) Flow charts should be included in the as-is blue print process flow document describing the complete process.

5) Next is the TO-BE process that will be implemented in SAP. This is based on the decision the project group arrives at taking into consideration the existing processes in the company and the functionality that SAP provides. It still awaits approval from the management.

6) After that there will be some things which cannot be implemented in SAP, the gaps are identified. These gaps are to be documented in white paper for the client and would presented to an audience chosen by the project manager.

IT 0105 – Communications

When a new subtype is created under Infotype 0105 Communications, how can we configure the new subtype to be a Short ID field (USRID) or Long ID field (USRID_LONG)?

The subtype of a Communications Infotype (IT 0105) can be configured either to be a short ID (30 char) or a long ID (241 char).

Use TCode SM31. Go to view V_T591C “Recipient Type for Communication Type”. This is a place where you can mention, what type of communication is your subtype (Ex: Text, Telephone, Email Address etc.) and also indicate if the new Subtype is a Long ID using the check box.

In addition, you can also define the Time Constraint of the new subtype.

Also try HRUSER – and link an user ID to an employee. linking this creates infotype 0105 for the employee HR master record

Schedule a SAP Query

To create the SAP Query, go to SQ01. 
Use SQ02 to create a program name for your query (Menu Query-> More Functions -> Display Report Name)
To schedule the SQP Query (use program name from previous step), use SM36 or SM36WIZ (WIZ – wizard where the conditions can be defined).
Output of the scheduled job can also be sent via email, Goto Exec. In Target, there is a recipient list button next to that in SM36, user name can be provided there.

As a alternate approach, you could also create a report that produces the same result as a query and this can be scheduled

Travel Management – Basics

Travel Management provides management of all travel activities including booking trips and handling of expenses associated with travel.


What can be done using Travel Management?
Using SAP Travel management, companies can track thier employees travel requests, reimbursements, travel expenses, online booking, etc.

1. Pre-trip approval – (configure spend limits), online booking, setting up workflow for approval process, we can also setup expense reporting to be automatically get approved(without waiting for workflow) if it is less than a limit.
2. Online booking integration – partners like amadeus, galileo/apollo, sabre.
3. Expense report submission – this form helps to submit travel expense reports
4. Approval workflow – approval workflow can be setup.
5. Expense reimbursement – integration to payroll, financials
6. Reporting – there are a number of standard reports that SAP provides.
Travel Management – Features
For Travel configuration, the following are the important features that are maintained:
TRVFD – travel fields
TRVFR – form variant for travel request
TRVFP – form variant for travel plan
TRVFE – form variant for travel expenses
Infotypes in Travel Management

470 – Travel Profile
471 – Flight preferences
472 – Hotel preferences
473 – Car rental preferences
474 – Train preferences
475 – Customer programs
017 – Travel priviledges
Roles
SAP_FI_TV_ADVANCE_PAYER
SAP_FI_TV_WEB_APPROVER
SAP_FI_TV_WEB_ASSISTANT
SAP_FI_TV_WEB_TRAVELER
SAP_HR_PT_TIME-ADMINISTRATOR
SAP_WD_CONFIG_ALL
For Installation instructions, Click here